Jira Software 9.13.x upgrade notes
Here are some important notes on upgrading to Jira Software 9.13.x. For details of the new features and improvements in this release, see the Jira Software 9.13 release notes.
Upgrading from 8.x to 9.x triggers full Jira reindex that causes some downtime during the process. If you’re on 8.x now, make sure you’ve estimated the downtime and set the best time for the upgrade.
Learn more about how to handle full reindex and estimate downtime
Upgrade notes
Jira Software 9.13.0 is a Data Center-only release and doesn't support Server licenses. With Atlassian Server end of support, you’ll need to ensure you have a valid Data Center license before upgrading to Jira Software 9.13.0. If you try to upgrade to release 9.13 or later with your Server license, Jira will fail to start, and you’ll need to downgrade to the version you were on before the upgrade or provide a valid Data Center license.
To update your Jira Software license:
- Go to Administration > General configuration > License details.
- Under Update license, enter your Data Center license key.
- Select Save.
Jira Software 9.12.x Long Term Support release will continue to support Server licenses until February 15, 2024. Learn more about your option
Always view the oldest or newest displayed comments first
Jira now remembers your preferred comment sorting order. Once you select how you’d like to see issue comments — newest or oldest first — the rest will be sorted in the same way.
You may log out or clear the cache, but the sort order won’t reset to the default “newest comments first” unless you change it.
Update the descriptions of multiple issues at the same time
When you need to adjust the descriptions of multiple issues, fixing each of them separately can take a while. Specifically, if it’s just a matter of changing a few lines.
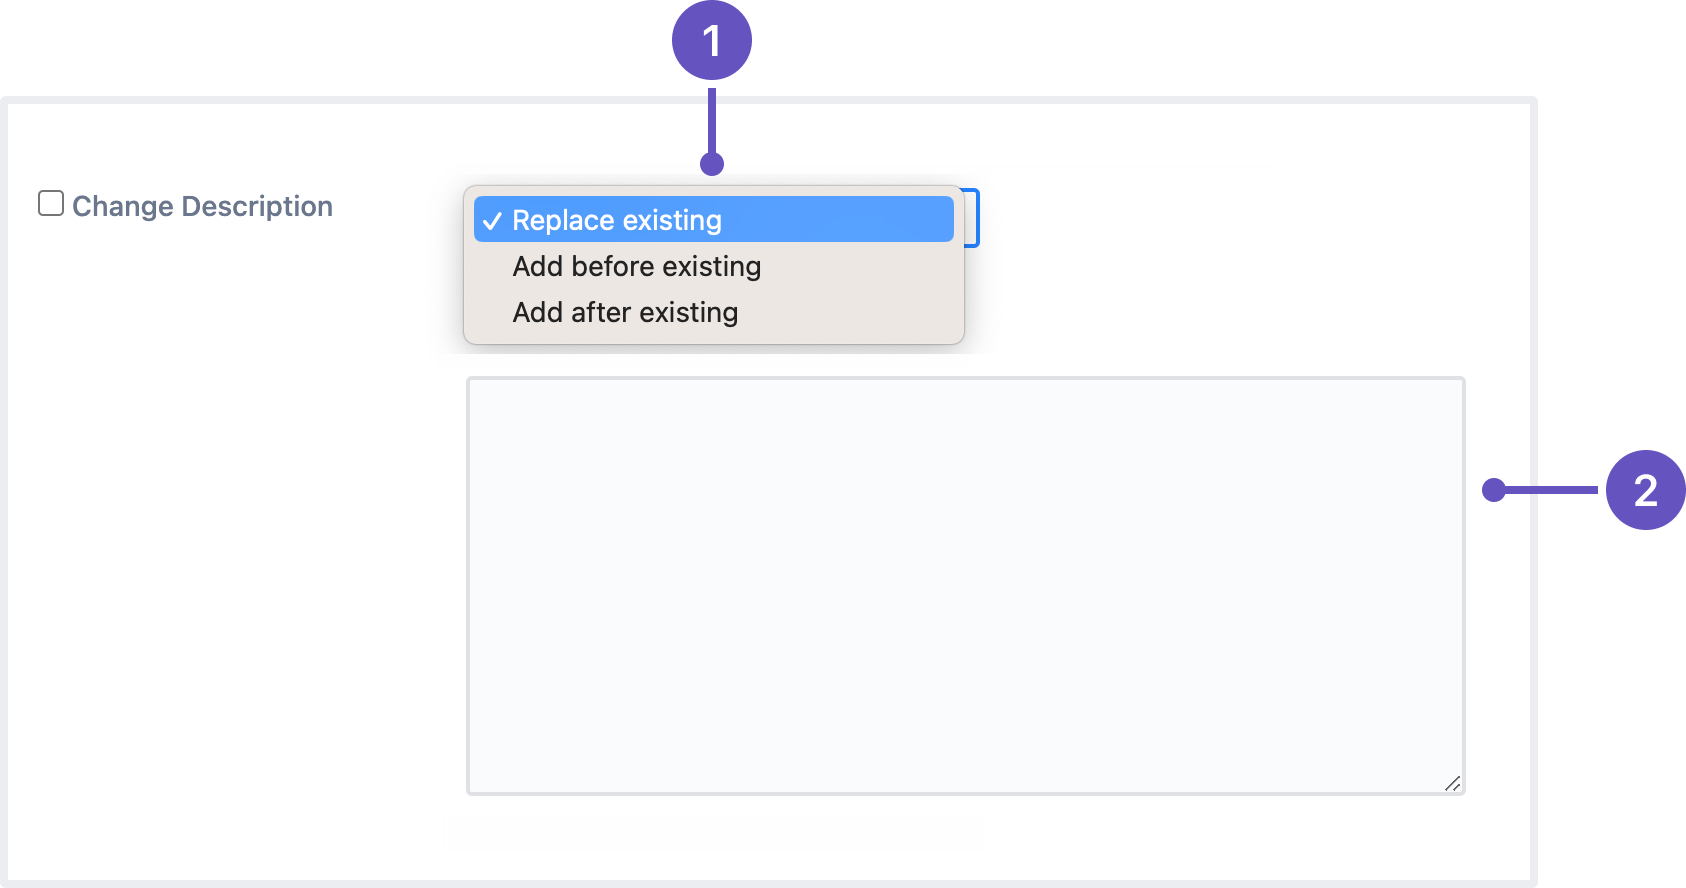
To save you time and make the issue editing process more efficient, we’ve added a new option to the bulk edit menu — Change description. It lets you auto-modify the descriptions of any selected issues in several ways:
- Options for updating the description field:
- Replace existing: replace the current description with new text
- Add before existing (the default option): add text at the beginning of the current description
- Add after existing: add text at the end of the current description
- A text field for the issue description
To bulk edit issue descriptions, users need to have the Edit issues permission for all selected issues. For more information, check out the following guides:
Add watchers while creating issues
Save time while keeping your team updated by adding watchers as you create issues. No need to waste time creating an issue and then immediately editing it to add watchers!
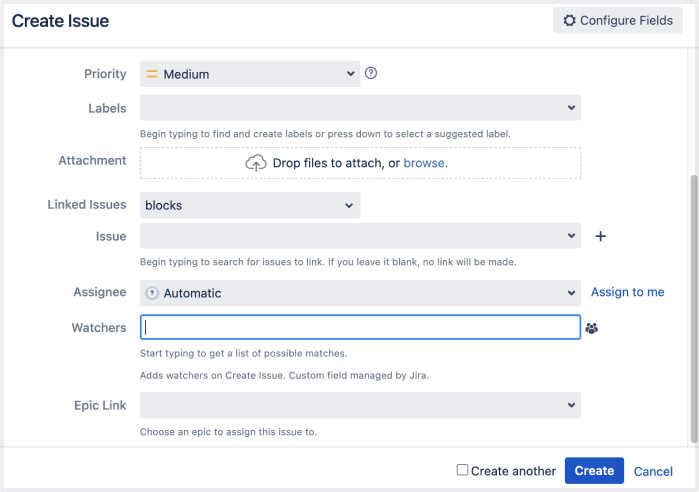
To use this feature, the admin needs to enable the feature flag com.atlassian.jira.initialwatchers.enabled.
When you’re creating a new issue:
- In the Create issue dialog, go to Watchers.
- Start typing to find the people you’d like to watch this issue.
- Select a person to add them as a watcher.
When you choose a watcher while creating an issue, they will be added to the issue after you select Create. In case the person you added isn’t in the correct project for the issue, Jira will notify you and won’t add them as a watcher.
Secure a database password by storing it in HashiCorp Vault
Secure your passwords by storing them in HashiCorp Vault. Admins can now enable the SecretStore implementation to read a database password from a Vault instance. This is an alternative, more secure option for storing database passwords as plaintext in an XML file.
To configure Jira to work with HashiCorp Vault:
- Create a secret in your HashiCorp Vault instance.
- Create a policy with permission to read your secret.
- Authenticate Jira with Vault.
- Add the Vault configuration data to the
<home-directory>/dbconfig.xmlconfig file.
Learn more about securing a database password in HashiCorp Vault
End of support announcements
There are no advance announcements for end of support. For the list of supported platforms, check out the Supported platforms guide.
App developers
For any important changes regarding apps, check out the Jira changelog.
Upgrade procedure
Upgrading from a Jira version 9.x.x?
- See Upgrading Jira applications for complete upgrade procedures, including all available upgrade methods and pre-upgrade steps.
- For a more tailored upgrade, go to Jira administration > Applications > Plan your upgrade. We’ll recommend a version to upgrade to, run pre-upgrade checks, and provide you with a custom upgrade guide with step-by-step instructions.


