Connect to Crowd or Jira applications for user management
You can connect Hipchat Data Center to Atlassian Crowd or to a Jira application (version 4.3 or later) for management of users and for authentication.
Connecting Hipchat Data Center to Crowd
You can connect Hipchat Data Center to Atlassian Crowd for user management and authentication. For more information on Crowd, see the Crowd Administration Guide.
When to use this option: Connect to Crowd if you want to import and synchronize users from and authenticate those users against Crowd.
You can't filter users from Crowd. When you sync users, you'll sync all users in Atlassian Crowd. See Hipchat Server synchronizes all users from Crowd directory for a workaround. Hipchat Data Center marks inactive users from Crowd as deactivated users and doesn't count them towards your license.
On this page:
To connect Hipchat Data Center to Crowd:
- Go to your Crowd Administration Console and add Hipchat Data Center. See Adding an Application in the Crowd documentation for more information.
- Browse to your server's fully qualified domain name, for example https://hipchat.yourcompany.com/.
- Log into the Hipchat Data Center web user interface (UI) using your administrator email and password.
- Click User management > External directory.
- Choose Add Directory then choose Atlassian Crowd. Enter the settings as described below.
- Save the directory settings.
- Define the directory order by clicking the up and down arrows next to each directory in the User Directories list. For details see Managing multiple authentication systems.
Settings in Hipchat Data Center for the Crowd directory type
Setting | Description |
|---|---|
Name | A meaningful name that will help you to identify this Crowd server amongst your list of directory servers. Examples:
|
Server URL | The web address of your Crowd console server. Examples:
|
Application Name | The name of your application, as recognized by your Crowd server. Note that you will need to define the application in Crowd too, using the Crowd administration Console. See the Crowd documentation on adding an application. |
Application Password | The password which the application will use when it authenticates against the Crowd framework as a client. This must be the same as the password you have registered in Crowd for this application. See the Crowd documentation on adding an application. |
Crowd permissions
Setting | Description |
|---|---|
Read Only | The users, groups and memberships in this directory are retrieved from Crowd and can only be modified via Crowd. You cannot modify Crowd users, groups or memberships via the application administration screens. Note: There are no user group structures within Hipchat Data Center. Group data is synchronized, but not used. |
| Read/Write | Not applicable to Hipchat Data Center. |
Advanced Crowd settings
Setting | Description |
|---|---|
Enable Nested Groups | Not applicable to Hipchat Data Center. When you sync your users, you'll sync every user that exists in the directory. |
Synchronization Interval (minutes) | Synchronization is the process by which the application updates its internal store of user data to agree with the data on the directory server. The application will send a request to your directory server every x minutes, where 'x' is the number specified here. The default value is 60 minutes. |
Connecting Hipchat Data Center to Jira applications
Subject to certain limitations, you can connect a number of Atlassian applications to a single JIRA application for centralized user management.
When to use this option: You can connect to a server running Jira 4.3 or later, Jira Software 7.0 or later, Jira Core 7.0 or later, or Jira Service Management (formerly Jira Service Desk) 3.0 or later. Choose this option as an alternative to Atlassian Crowd, for simple configurations with a limited number of users.
You can't filter users. When you sync users, you'll sync all users in the Jira application. Hipchat Data Center marks inactive users from the Jira application as deactivated users and doesn't count them towards your license.
To connect Hipchat Data Center to a Jira application:
- Configure the Jira application to recognize Hipchat Data Center:
- Log in to the Jira application as a user with the Jira Administrators global permission.
- Choose
 > User Management > User Server.
 Keyboard shortcut: 'g' + 'g' + start typing 'jira user'.
 - Add an application.
- Enter the application name and password that Hipchat Data Center will use when accessing the Jira application.
- Enter the IP address or addresses of Hipchat Data Center.
- Save the new application.
- Configure Hipchat Data Center to connect to a Jira application:
- Browse to your server's fully qualified domain name, for example https://hipchat.yourcompany.com/.
- Log into the Hipchat Data Center web user interface (UI) using your administrator email and password.
- Click User management > External directory.
- Click Add Directory then choose Atlassian Jira. Enter the settings as described below.
- Enter the settings as described below. When asked for the application name and password, enter the values that you defined in the settings on the Jira application.
- Save the directory settings.
- Define the directory order using the arrows next to each directory in the User Directories list.
Here is a summary of how the directory order affects the processing:
- The order of the directories is the order in which they will be searched for users.
- Changes to users will be made only in the first directory where the application has permission to make changes.
Settings for the Jira directory type
Setting | Description |
|---|---|
Name | A meaningful name that will help you to identify this Jira server in the list of directory servers. Examples:
|
Server URL | The web address of your Jira server. Examples:
|
Application Name | The application name that Hipchat Data Center will use when accessing the Jira application. |
Application Password | The password that Hipchat Data Center will use when accessing the Jira server that acts as user manager. |
Permissions for the Jira directory type
Setting | Description |
|---|---|
Read Only | The users, groups and memberships in this directory are retrieved from the Jira server that is acting as user manager. They can only be modified via that Jira server.
Note: There are no user group structures within Hipchat Data Center. Group data is synchronized, but not used. |
Advanced Settings for the Jira directory type
Setting | Description |
|---|---|
Enable Nested Groups | Not applicable to Hipchat Data Center.
|
Synchronization Interval (minutes) | Synchronization is the process by which the application updates its internal store of user data to agree with the data on the directory server. The application will send a request to your directory server every x minutes, where 'x' is the number specified here. The default value is 60 minutes. |
Diagrams of some possible configurations
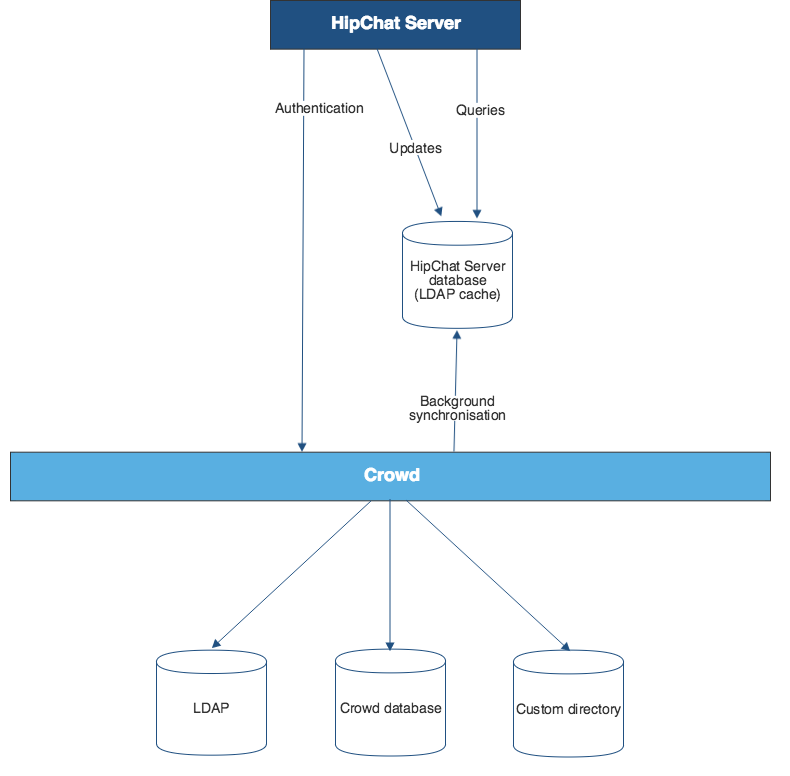
Diagram above: Hipchat Data Center connecting to Crowd for user management.
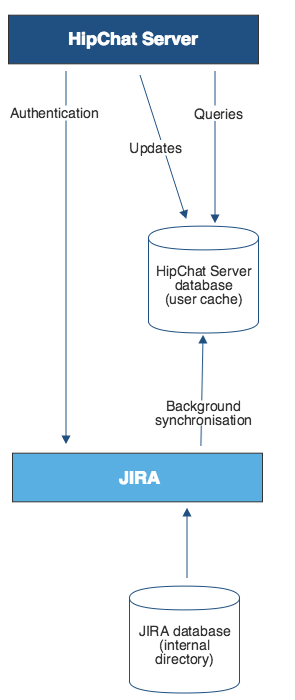
Diagram above: Hipchat Data Center connecting to a Jira application for user management. The Jira application does the user management, storing the user data in its internal directory.
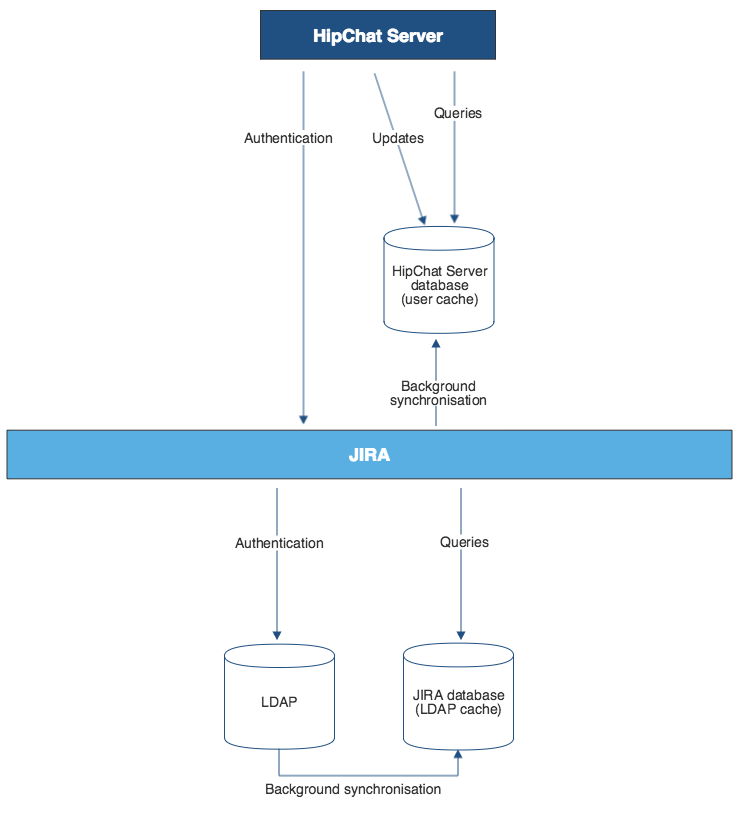
Diagram above: Hipchat Data Center connecting to a Jira application for user management, with the Jira application in turn connecting to an LDAP server.