Restoring manually multiple attachments from a File System backup into an imported Space
Platform Notice: Data Center - This article applies to Atlassian products on the Data Center platform.
Note that this knowledge base article was created for the Data Center version of the product. Data Center knowledge base articles for non-Data Center-specific features may also work for Server versions of the product, however they have not been tested. Support for Server* products ended on February 15th 2024. If you are running a Server product, you can visit the Atlassian Server end of support announcement to review your migration options.
*Except Fisheye and Crucible
This guide applies if you have imported a space XML backup and some or all of the attachments in the space were not successfully imported, but the database and attachments are still available on the old system.
Purpose
There are several reasons why attachments may not be successfully imported during a space export / import.
One of the common reasons is the export process was unable to find the attachment file in the attachments folder. If this happens you will see an error like this in the application log from the old system:
2020-09-03 18:15:29,723 WARN [Long running task: Export Space] [persistence.dao.hibernate.AbstractHibernateAttachmentDao$IntraHibernateAttachmentCopier] saveAttachmentData There was a problem retrieving 'Attachment: Atlassian_Casey Dunn$
2 -- url: /c740/spaces/doexportspace.action | referer: http://localhost:6740/c740/spaces/exportspacexml.action?key=ATS | traceId: bd60ef28ff0f800a | userName: admin | action: doexportspace
3$y Dunn_Open Collab Level 16.jpg v.1 (327706) admin' from the data store. Skipping. No such file for Attachment: Atlassian_Casey Dunn_Open Collab Level 16.jpg v.1 (327706) admin. Were looking at /Users/bjohnson3/confluence-home/atlassia$
4 -- url: /c740/spaces/doexportspace.action | referer: http://localhost:6740/c740/spaces/exportspacexml.action?key=ATS | traceId: bd60ef28ff0f800a | userName: admin | action: doexportspace
Another reason the attachments may not be successfully imported is because there was an issue during the import process. In this case you might see an error like this in the logs from the new system:
WARN [Long running task: Importing data] [confluence.importexport.xmlimport.DeferredOperations] reportOutstandingOperations Uncompleted deferred operations waiting for:[class = com.atlassian.confluence.content.ContentProperty, id = 286229001]It is possible that you might see different or additional errors in the logs as well, and if attachments are missing after importing a space into Confluence we do have an existing process for Restoring attachments from a filesystem backup to an imported space. If there are a large number of attachments, the manual process can take too long to perform, and it would be faster to perform the procedure programatically.
Solution
You'll need to download the Attachment Migration Script, which will parse a CSV file and then create a new attachments folder that can be transferred into the attachments folder on the new system.
These are the steps you will take to perform this procedure:
Make a copy of the attachments folder from the old system and move it to the system where you have python installed.
Run sql queries on the old and new systems to identify the appropriate IDs and put the results into a spreadsheet.
Create two index columns in the spreadsheet based on the attachment name, page title and space key.
Use the VLOOKUP function to correlate the old attachment space ids, page ids, and attachment ids to the new ones and then save the results as a separate csv file.
Configure and run the python script to create a new attachments folder.
Merge the new attachments folder into the appropriate attachments directory in the new system.
(Optional) Ask end users to refresh their browser cache.
Step 1 - Moving The Attachments Folder From the Old System
You will want to identify the attachments folder for the space on the old system using the information in our Hierarchical File System Attachment Storage article. This will typically be the <shared home>/attachments/ver003/<least significant 3 digits of the space id, modulo 250> directory. Once you have identified this folder you will want to copy it to the new system and make sure Python 3.5+ is installed on that system. The folder can be located anywhere on the new system, and you should make sure that there is enough disk space on the new system (you will need at least 2x the size of this directory since we will be copying this directory with the script).
Step 2 - Querying the Databases On Both Systems For the Necessary IDs
We need to query the database on the old system and the database on the target system for the necessary IDs.
To do this, run this SQL statement on the old system:
PostgreSQL
select attachment.title as "Attachment Name",
page.title as "Page Title",
spaces.spacekey as "Space Key",
spaces.spaceid as "Old Space ID",
page.contentid as "Old Page ID",
attachment.contentid as "Old Attachment ID"
from content attachment
inner join content page on attachment.pageid = page.contentid
inner join spaces on attachment.spaceid = spaces.spaceid
where attachment.contenttype = 'ATTACHMENT' and attachment.prevver is null and spaces.spacekey = '<SPACEKEY>'
And run this SQL statement on the new system:
PostgreSQL
select attachment.title as "Attachment Name",
page.title as "Page Title",
spaces.spacekey as "Space Key",
spaces.spaceid as "New Space ID",
page.contentid as "New Page ID",
attachment.contentid as "New Attachment ID"
from content attachment
inner join content page on attachment.pageid = page.contentid
inner join spaces on attachment.spaceid = spaces.spaceid
where attachment.contenttype = 'ATTACHMENT' and attachment.prevver is null and spaces.spacekey = '<SPACEKEY>'
Please make sure you replace
<SPACEKEY> with the actual space key for the space. If necessary, a space administrator can go to Space tools > Overview > Space details to confirm space key.
After running these queries, you will want to save the results as a CSV file, which we will use in the next step.
Step 3 - Adding the Results Into a CSV and Creating Index Columns
You will want to copy the results from the new system into the top left cell in the spreadsheet.
Then leave a blank column to the right of the results and copy the results from the old system into the top cell in the next column.
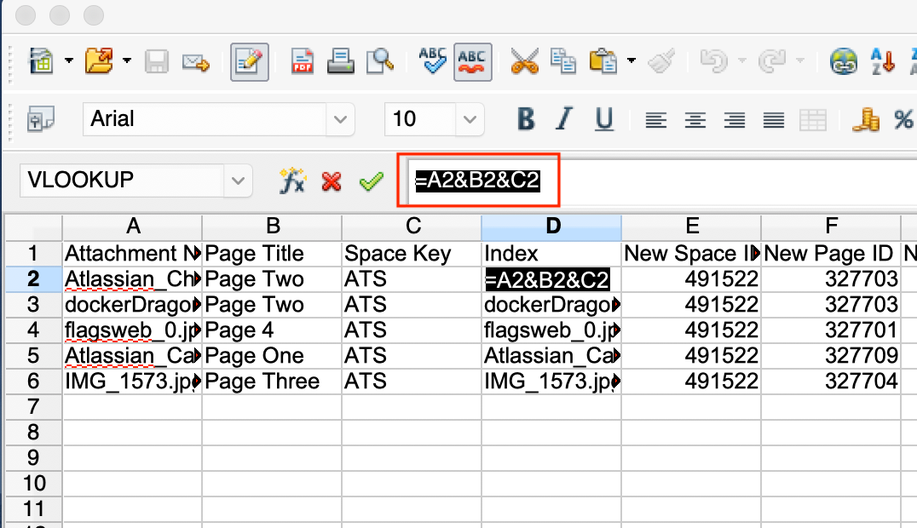
Now insert a column between the Space Key and Space ID columns in each result set for the correlation index. To create the index you can just use the concatenation operator (ie. '=A2&B2&C2') in the formula bar like this:
FInally, you should have two index columns (one in the new result set and one in the old result set) with a string in it that is a combination of the attachment name, page title, and space key.
You will want to copy the index from the first row and paste it into every additional row so this value exists for all rows in the spreadsheet (you will need to do this for for the old result set and the new result set).
At this point your spreadsheet should look similar to this example:
Step 4 - Using VLOOKUP to Correlate the IDs From The Two Systems and Saving as a New CSV
We need to correlate the IDs from the old system to the new system.
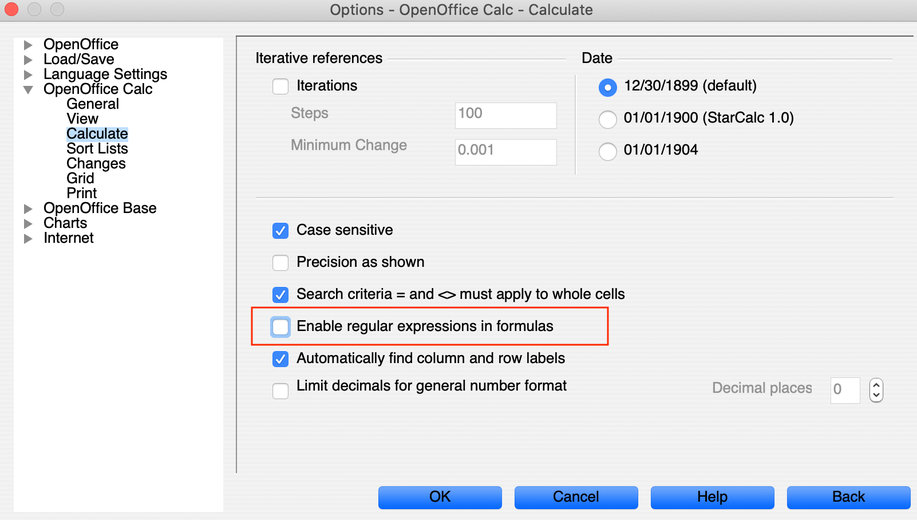
To do this we will use the VLOOKUP function. For example, If you are using OpenOffice Calc, make sure you go into the OpenOffice menu > OpenOffice Calc > Calculate and then uncheck the ‘enable regular expressions in formulas’ option. This option is enabled by default, and leaving it enabled can interfere with the VLOOKUP results:
Now let's review how VLOOKUP works and match up our old ids to our new ids.
The first thing you will want to do is add 3 new columns right after the old attachment id column. Please make sure you use the same header names (New Space ID, New Page ID, New Attachment ID). Once that’s done you will want to use a VLOOKUP formula to correlate the ids such as this one:
=VLOOKUP(L2;$D$2:$G$6;2;0)Here is an example:
This VLOOKUP formula basically tells OpenOffice CALC to match the value in L2 to the corresponding value in the range of D2 and G6, which is where we put the new IDs. Since we created the index, and since an attachment with the same name should not exist in the same page in the same space, this should correlate everything accurately.
VLOOKUP basically takes 4 arguments, separated by a ; (this would be a comma in Excel). x also added a $ before each letter and number in the target range so that these cell letters and numbers are frozen and we can quickly and easily copy and paste this cell into the cells below it to populate the rest of the rows in each column. The 2 in the second to last field in the VLOOKUP tells us to return the value in column 2 of the range we are comparing, and you will pretty much always want to add 0 (or false) for the last field.
Please keep in mind we are using OpenOffice CALC in this example, but you can also use the VLOOKUP function in Excel to do this. Once you have finished the first column you will want to change the 2 in the second to last field of the VLOOKUP to a 3 for the next column, and then change it again to a 4 for the last column. For additional information on how VLOOKUP works, you can visit the OpenOffice website. At this point our spreadsheet should look like this:
You should also manually verify a couple of the IDs in the VLOOKUP columns by comparing them to the values in the original columns on the left. Now we just need to copy the values in the last 6 columns of this sheet and then right click and use paste special to add them into a new sheet. You can just hit ok and use the defaults for paste special, and we are using paste special because we want to copy over the values in the cells instead of the formulas.
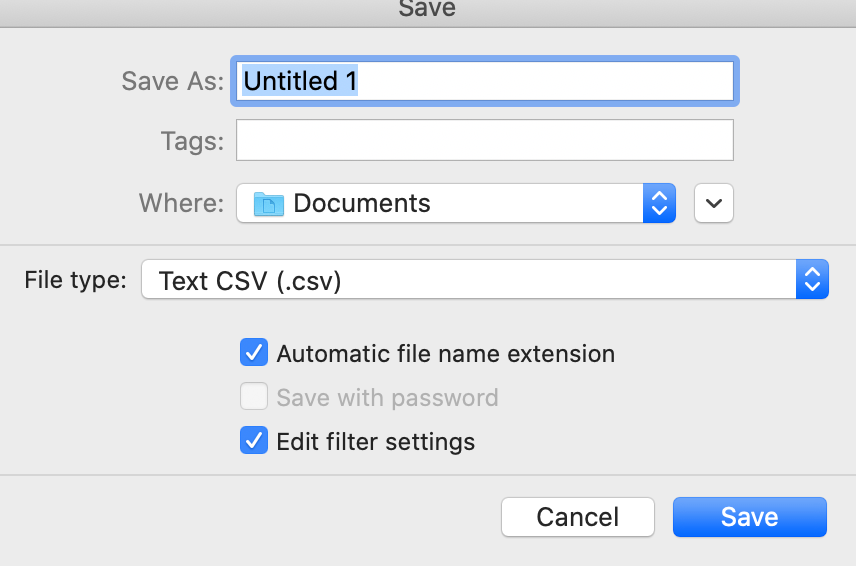
Now we want to review our results in this sheet and remove any "N/A' values so we only have IDs in every cell of the new sheet. This is very important since the python script will not work if any of the values in the new sheet are not integers. Now save the new sheet as a CSV file. To do this just hit file, save as and then choose Text CSV (.csv) for the file type. You will also want to make sure you check the ‘Edit filter settings’ option on the save screen.
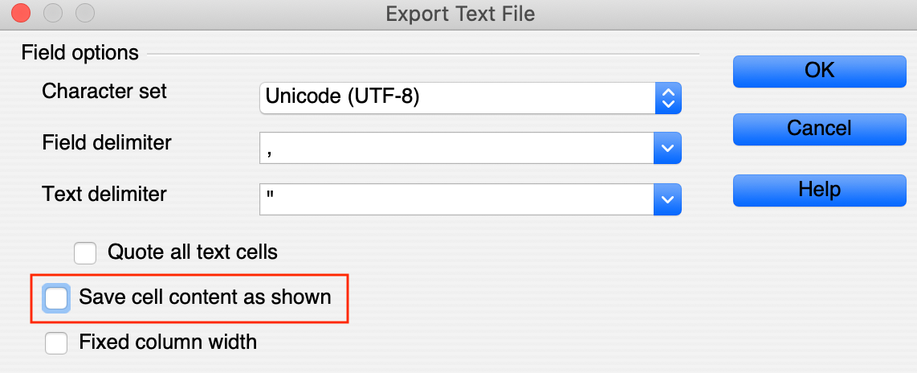
If you are using OpenOffice CALC you need to uncheck the ‘Save cell content as shown’ option on the next screen, which is also enabled by default:
Having this enabled can cause issues when the python CSV library that we are going to use tries to parse the CSV file, so please make sure you remember to disable this option.
Step 5 - Configuring and Running the Python Script
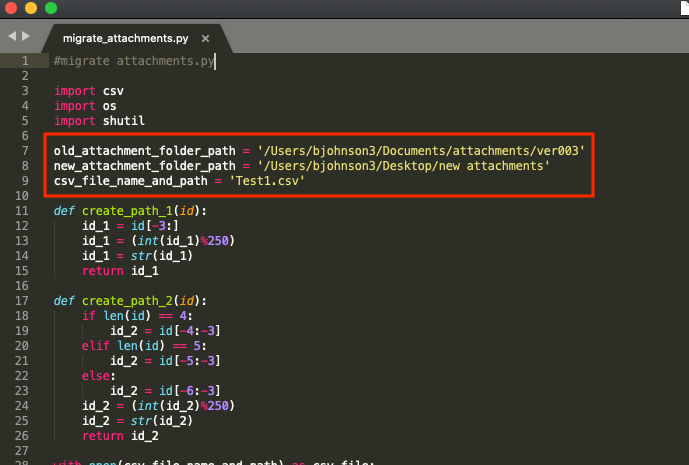
Once the CSV file is created we just need to open the python script and specify the location for the old attachments folder, the location where we will create the new attachments folder, and the CSV file name and path:
In this example we kept the CSV file in the same directory as the python script. Please note the new attachments folder can be any folder anywhere on disk. It just needs to be empty and have enough disk space available for the attachment that are being copied. Once this is done we just run the script with python3. The script may take some time to run depending on how many attachments there are, and here’s what the output should look like once it's finished:
Step 6 - Merging the Folder Into the Attachments Folder on the New System
Once the script is finished you should have a new attachments folder with the correct file paths based on the IDs in the new system. At this point you should be able to just merge the folder into the the <shared home>/attachments/ver003/<least significant 3 digits of the space id, modulo 250> directory on the new system (you can use rsync to merge the directory if you are using linux or mac, or just drag the directory into the folder if you are on windows). In most cases, you will want to make sure that you do not overwrite any conflicting files, since it is possible that some users will have already updated the attachments in the new system manually.
Step 7 - Asking End Users to Refresh Their Browser Cache
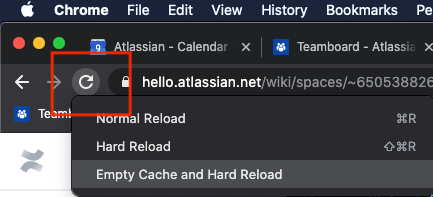
Some end users may need to perform a hard refresh in their browser to see the attachments in Confluence. In chrome you can do this by opening developer tools, then right clicking the refresh button in the upper left part of the screen and hitting Empty Cache and Hard Reload:
Troubleshooting
While running the script, you may see a ValueError like this:
Traceback (most recent call last):
  File "migrate_attachments.py", line 46, in <module>
    old_file_path = create_path_1(row[0])
  File "migrate_attachments.py", line 23, in create_path_1
    id_1 = (int(id_1)%250)
ValueError: invalid literal for int() with base 10: 'N/A'
If this happens, it is because the CSV file you created has values in it that are not integers. Please make sure you remove any 'N/A' values, and that the CSV file only contains 6 columns with the valid IDs in them.
