How to configure Custom Claims in Okta for OpenID Connect (OIDC)
Platform Notice: Data Center - This article applies to Atlassian products on the Data Center platform.
Note that this knowledge base article was created for the Data Center version of the product. Data Center knowledge base articles for non-Data Center-specific features may also work for Server versions of the product, however they have not been tested. Support for Server* products ended on February 15th 2024. If you are running a Server product, you can visit the Atlassian Server end of support announcement to review your migration options.
*Except Fisheye and Crucible
Summary
As described in Using an OpenID Connect to integrate with Okta, your Atlassian application looks for the username within the ID token which is sent by the OpenID Provider (IdP). This token consist of a set of attributes called claims. One of the claims, sub, is by default used to determine one’s username. Some IdPs, however, don’t use the sub claim for passing on the username (for example, Okta includes a username in the preferred_username claim). In such cases, you must must point your Atlassian applications to a custom claim which contains the username.
This KB shows in few steps how to configure such custom claims if sub or preferred_username are not used.
Be mindful that customisations are not part of our support scope as per Atlassian Support Offerings. Any effort provided to support issues related to customisation will be on a best-effort basis by the support engineer.
Diagnosis
When trying to log into the application, one of the following error messages may be found in the logs after getting back the IdP redirection.
For example, if you have configured your username mapping using a claim that exists, but it is not the correct one, Confluence will not be able to find the actual user:
2023-11-22 08:24:48,867 ERROR [http-nio-8090-exec-10 url: /plugins/servlet/oidc/callback] [impl.web.filter.ErrorHandlingFilter] logException [UUID: 18cd9479-e102-4eae-9753-f07bef0fb146] Received SSO request for user 00u6srvq6zfdg7tbz1d7, but the user does not exist
-- referer: https://testings.okta.com/ | url: /plugins/servlet/oidc/callback | traceId: 26ac6bf4d5de000d | userName: anonymous
com.atlassian.plugins.authentication.impl.web.usercontext.AuthenticationFailedException: Received SSO request for user 00u6srvq6zfdg7tbz1d7, but the user does not exist
at com.atlassian.plugins.authentication.impl.web.oidc.OidcConsumerServlet.lambda$null$1(OidcConsumerServlet.java:129)
...
...
In case, that username mapping does not even exists, it will fail with the following message:
2023-11-22 08:12:21,494 ERROR [http-nio-8090-exec-2 url: /plugins/servlet/oidc/callback] [impl.web.filter.ErrorHandlingFilter] logException [UUID: f6dc9fc4-9168-42da-af65-3e2dc25fef5e] Couldn't find claim representing username
-- referer: https://testings.okta.com/ | url: /plugins/servlet/oidc/callback | traceId: 96585d6ee1fc6a61 | userName: anonymous
com.atlassian.plugins.authentication.impl.web.usercontext.AuthenticationFailedException: Couldn't find claim representing username
at com.atlassian.plugins.authentication.impl.web.oidc.OidcConsumerServlet.getUsernameFromUserInfoEndpoint(OidcConsumerServlet.java:242)
...
...
Solution
To address this situation, a new claim needs to be created in Okta and call it in user mapping field in Confluence application.
- As an Okta administrator, go to Security > API
In the Authorization Servers tab, edit your Authorization Server
- Click on the Claims tab
- Select Add Claim and fill in the values as follow:
Name = MyUserClaim (you can give any name)
Include in token type = ID Token and Userinfo / id_token Request
Value Type = Expression
Value = toLowerCase(String.replace(substringBefore(appuser.userName, "@"), ".", ""))
- Click Create once finished
Above expression to get the substring username from the mail address username@domain.com. This expression is valid when your username field for login is actually a mail address. If Okta is using a different field or a custom field to store the mail address, then you will have to modify field name in the above expression.
Expressions must be written using the Okta Expression Language
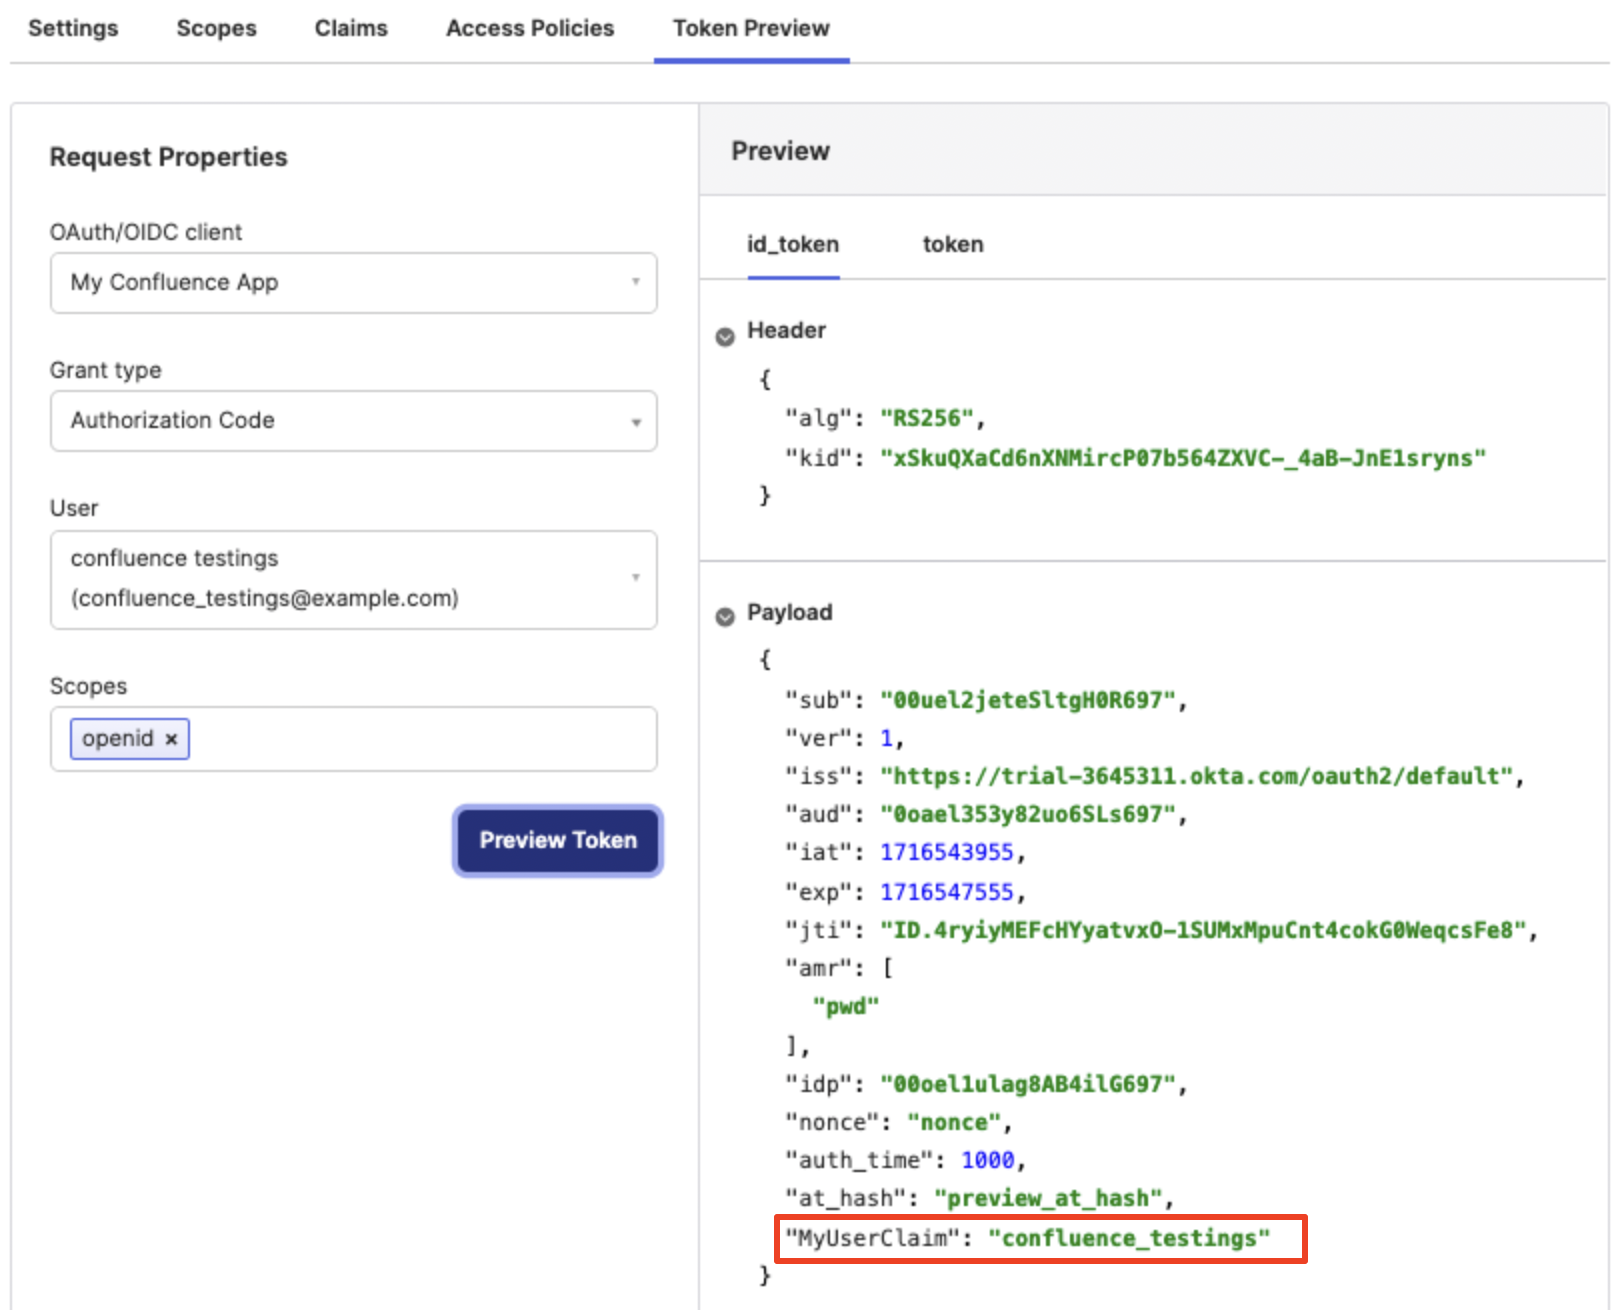
Now, it is time to validate that previous expression returns the result expected. Browse to Token Preview tab and verify the new claim is included in they Payload. See example below:
Now, going back to Confluence, you need to replace the Username mapping of the Okta Authentication Method with the new claim created:
- Browse to General Configuration > Authentication Method
- Edit an Open ID option and add username mapping = ${MyUserClaim} and click Save.
Test the new configuration
Related Knowledge
- OpenID Connect for Atlassian Data Center applications
- How to integrate Confluence DC with Okta for SAML 2.0 SSO
- OpenID Connect (OIDC) SSO fails with "Error when fetching data from userinfo endpoint"

